I've been frustrated with the cheap
iMC Motocom BTS200 Bluetooth headsets that only served as an intercom system for me and my passenger when riding two-up since I brought the bike home in July of 2010. I had been able to link to the GPS, but only if I was willing to give up the intercom feature. These features were supposed to work together but I tried many times to make it work without success. In addition the VOX feature on the BTS 200 has a long delay and tends to shut off in the middle of sentence making it a pain to use.
I also had a desire to integrate a headset and intercom with the bikes built in audio system and
Garmin Zumo 660 Navigation so that I could take advantage of the audio controls on the bike as well listen to MP3s and FM radio on my headset as well as hear turn by turn directions from the navigation unit.
 |
| 2010 R1200RT |
I researched every system and headset I could find over the course of a year. None of the wireless systems I found were designed to be integrated with the factory audio system. Having paid a small fortune to get it on the bike I was determined to find a way to integrate the system. I did consider several custom solutions that all depended on working from the optional rear speaker connector, but none panned out.
I looked into activating the factory Bluetooth option on the bike, but all of the reviews that I could find indicated that it only worked well for a single rider and in some cases only seemed to work well with BMW helmets. There we several reports of poor audio quality as well.
Enter
J&M Corporation.
As is well known J&M makes systems for many bikes including BMW models. J&M did not initially have a system for the R1200RT. I wrote the company several emails in 2010 and they assured me that a system was coming out for the RT. They were already producing the helmet headsets that I would need to fit to my Nolan N103 and Shoei Multitec. Finally in 2011 they began releasing the components that I would need.
The final system would consist of 4 main components:
As it turns out I would have two options for integrating the Zumo 660. I could pair it to the rider headset as a second device, or I could devise way to make it act like the factory BMW NavIV system and integrate with the factory stereo. Had a realized the lack of integration with the Zumo vs the BMW NavIV I might have opted to install the NavIV instead. Since I already own the Zumo 660 I opted to do my own integration with the factory system.
This would not be a cheap system to install at a list price o
f $1,599.96. J&M ran a Black Friday 20% off special which brought the price down to a still substantial, but more reasonable $1,279.96 delivered. After several emails back and forth with the owner of the company
John Lazzeroni I ordered the complete system and it was delivered promptly via FedEx ground (indirect signature required.)
The order arrived well packed in recycled materials.
 |
| Recycled shredded catalogs or other paper used for packing. |
Several boxes were packed inside in retail packaging.
 |
| Nolan N-103 Headset |
 |
| Nolan N-103 Headset opened up |
 |
| Universal flip front headset for the Shoei Multitec |
 |
| Blue Hub Dongle08 |
 |
| R1200R adapter Harness for the Blue Hub Dongle08 |
The first order of business was unpacking everything and laying it all out, followed by reading and re-reading all of the accompanying installation instructions. The quality of the instructions vary a bit for the various components and I will discuss that a bit later. Instructions are included in each kit and most of them are also available on the product pages at the J&M web site.
Here is what is included in each of the packages.
 |
| N-103 Headset kit |
The N-103 headset kit includes a replacement trim piece that houses the battery and on-off switch, helmet speakers, the control unit, microphone with foam windsock and a universal power supply with an assortment of plugs for various countries mains. The power supply has two cords, presumably to allow charging two N-103 kits with the same charger. The charger does not fit the other universal headset.
 |
| Universal headset to fit most flip front helmets |
Like the N-103 kit this universal kit contains the helmet speakers control unit, microphone with windsocks and a universal power supply. There is no helmet trim for this unit and it mounts using a clamp system.
I'll cover the installation of these systems a bit later.
 |
| Blue Hub Dongle08 Kit |
The Blue Hub Dongle08 kit includes the Dongle itself, 2 antennas, the switch for front and rear pairing, and a power supply unit that connects to batter and switch power to run everything that connects directly to the bike. Wire ties, electrical connectors and double sided mounting tape are also included. This adhesive on this tape is really aggressive so be sure you have everything perfectly aligned when using it.
One thing I noticed is there there is no indication of which pairing button goes with which antenna or identification of rider or passenger. Since one antenna is to be mounted in the rear of the bike and one in the front it's important that they be identifiable.
 |
| R1200RT adapter harness |
The R1200RT dongle adapter harness includes the main harness, a small cable to connect a cell phone and wire ties. The harness has plus that connect into the factory speaker wiring harness and to a connector on the Dongle08. There are also connectors for expansion of the system to include a radar detector input (additional cable required.) The on-off switch controls output to the main speakers. The Bluetooth system is always on when the ignition is on but the main speakers can be switched off if desired.
The cables seem to be of high quality and are plenty long enough. I do have some concern that some of the connectors are not waterproof designs.
Onto the installation
Zumo 660 Integration Cable
The first thing that I needed to have is the Zumo 660 integrated into the bike if I wanted to be able to have it mute the music when turn by turn navigation commands are output. The other option would have been to pair the riders headset to the Zumo but I wanted to be as integrated as possible. In order to accomplish that I needed to pass the output signal from the Zumo into the factory connector where the BMW NavIV would have connected. I already had the Zumo power coming from the factory connected. The dealer installed that for me when I took delivery of the RT.
The integration is complicated by the fact the RT audio input to the RT factory radio for the NavIV system is mono and the output of the Zumo 660 is stereo. I also did not want to modify the RT wiring harness.
To accomplish the integration I constructed a simple cable with a couple of resistors to sum the stereo out put of the Zumo into a mono signal. Connecting the two output wires together without isolation could potentially damage the output devices in the Zumo.
The following images illustrate how the integration cable is constructed.
 |
| BMW repair cable |
 |
| Cable parts |
 |
| Shrink tubing |
 |
| Finished Cable |
 |
| Cable Schematic |
Once the cable is completed it is plugged into the audio output connector on the Zumo and into the audio input on the RT located near the steering head.
Here is what the audio input connector looks like. You will find this connector in front if the steering head.
 |
| BMW R1200RT GPS NAV IV or Garmin Audio Connector |
Here is the audio connector after connecting the adapter. Note the blue connector body and yellow wires of the repair connector.
 |
| BMW R1200RT GPS NAV IV or Garmin Audio Connection |
Here is a view from the front with the nose removed. You can see both connectors and the repair connectors inserted allowing the Garmin to get power and output audio to the RT.
 |
| BMW R1200RT GPS NAV IV or Garmin Audio and Power Connections |
Helmet Installation
Nolan N-103 Install
I began the J&M installation with the helmets starting with the Nolan N-103. The first order of business is to remove the liner, cheek pads and trim from the N-103
 |
| Liner and cheek pads removed. |
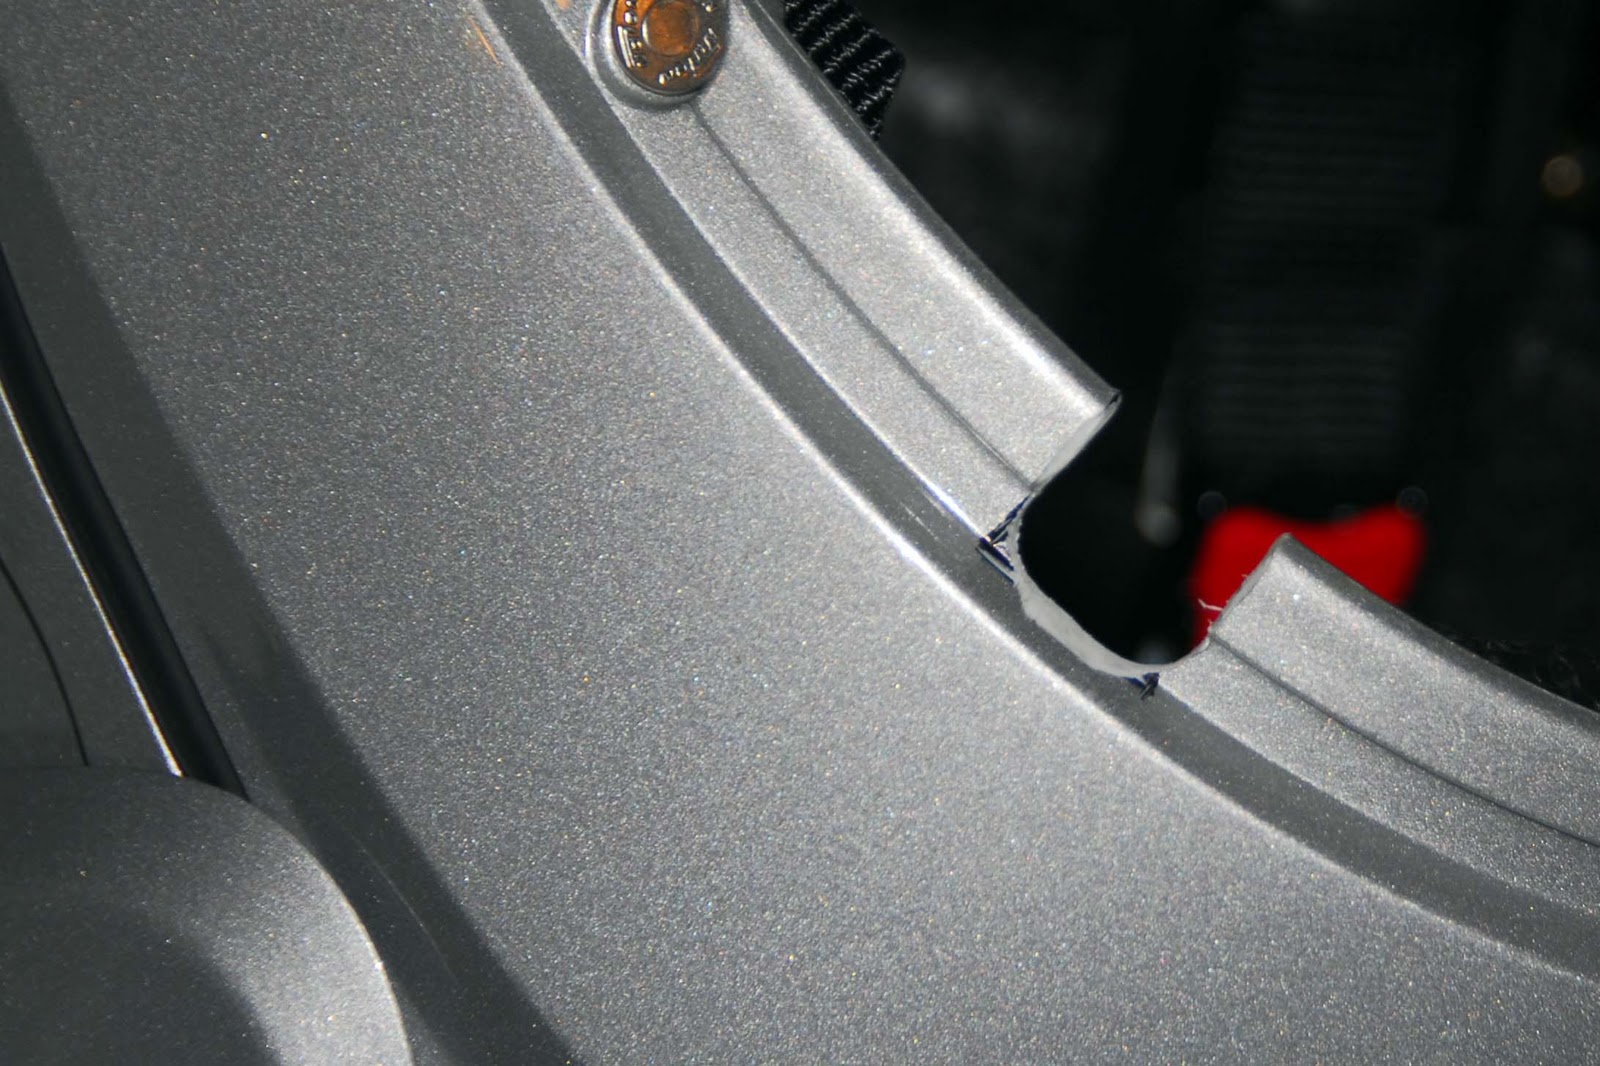
Next I measured and marked the N-103 for a cutout that is required for the power switch assembly. The was a part that I not very comfortable with so I checked myself several times before considering removing any material from the shell.
 |
| N-103 Marked for cutting the switch opening |
I used a carbide burr in a die grinder to cut the prescribed opening in the shell and then cleaned up the opening a bit with a utility knife. I scribed the marks with the knife ahead of cutting to help avoid chipping the paint.
 |
| N-103 after cutting |
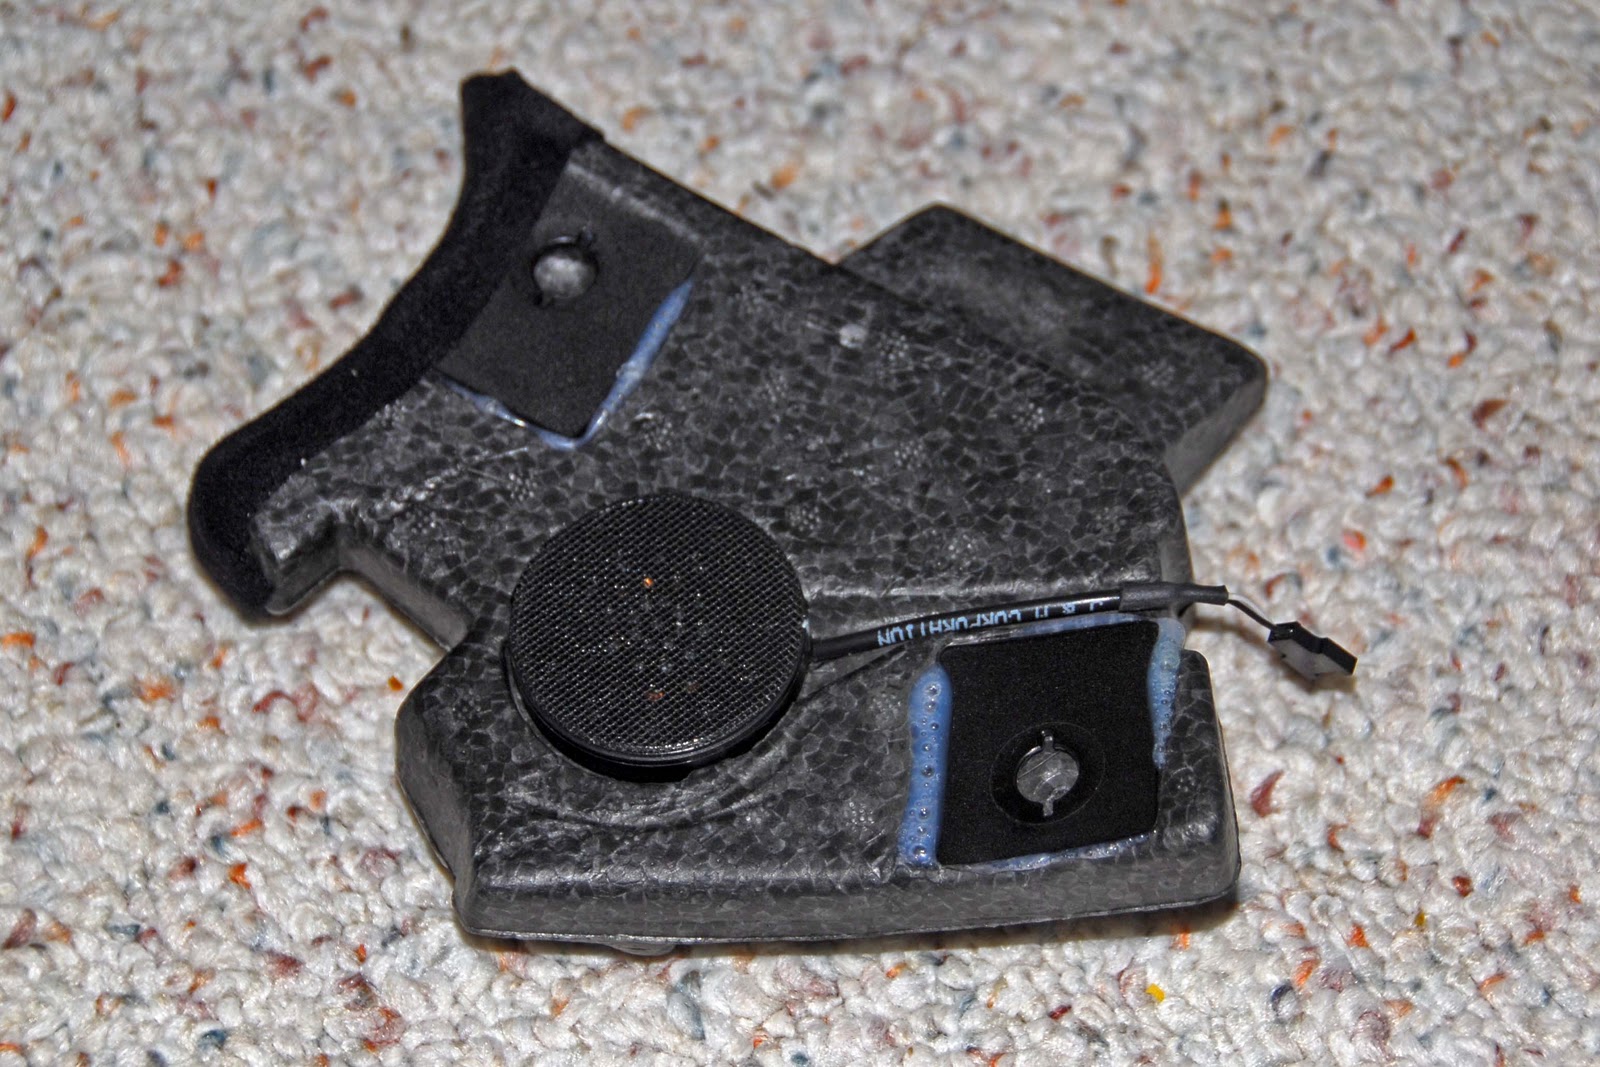
 |
| N-103 Trim Installed |
 |
| Styrene and helmet speakers ready to mounted on Velcro |
 |
| Helmet Speaker Installed |
The helmet speakers fit perfectly in the factory openings and do not intrude into the helmet. There are knockouts in the cheek pads that are removed to allow the sound to pass through.
 |
| Completed N-103 headset install |
The control unit simply snaps in place in the factory opening designed for the Nolan N-Com system. The finished product looks like it was made for it, as it is.
Shoei Multitec Install
The Shoei was next. This turned out to be an issue. The first problem I encountered was trouble mounting the clamp that secures the control unit to the shell. I found it difficult to get the clamp to fit between the shell and styrene liner. I found myself prying harder than I thought I should to get it to fit.
I emailed J&M about this issue and they said it should not be an issue. I also found out that the headset I bought did not have the right speakers. Apparently the helmet speakers in the kit are two thick and contact the wearers ears. I was surprised to find this out since I had contacted J&M via email prior to ordering the kit and had specified the helmets I was using.
At this point J&M had suggested that I send the Shoi to them to complete the install. I've since sent it to them and time will tell how that goes. I'll provide an update when the process is completed.
R1200RT Install
Tupperware Removal
The first order of business on the RT was to strip off the tupperware. I considered only removing part of it but quickly found it was going to be easier just to remove it all. This was my first time removing it and it was a little intimidating at first but it turned out to be not that big a deal. It does require some time and patience. The trickiest part was removing the mirrors since there is a hidden screw and is located in the glass assembly. There are details in the forums if you need help as I did the first time. You can also find a video on removing the panels here
Body Panel Removal.
Here is how the RT looked before I started the J&M install.
As you can see most of the tupperware is removed with the exception of the tail piece.
There are five basic components to install
- The Blue Hub Dongle08
- The Power Supply
- The Adapter Cable
- The Front Antenna for the rider
- The Rear Antenna for the Passenger
Blue Hub Installation
The Blue Hub is on the large side so mounting options are somewhat limited. The cable lengths are plenty long to mount it anywhere under the seat area. The only relatively short cable is for the pairing swithes and indicators.
 |
| Blue Hub Dongle08 Looking for a Home |
 |
| Blue Hub Dongle08 Trial Fit |
After a few trials I settled on mounting the Dongle in the very back of the tail section against the back wall. I opted for Velcro attachment since I may need to remove it if I need to service the wiring back there or work on the tail light. It would also be tough to remove it from there if the double sided tape was used. There are no mounting tabs either so Velcro seemed like the best option.
 |
| Blue Hub Dongle08 and Rear Antenna Mounted |
The dongle is mounted in the tail section and the rear antenna can also just be seen in this shot at the lower right hand corner. The forward antenna cable reached the front faring area at the dash and the other cables were no issue. Cables are routed along the frame.
 |
| Rear Antenna Mounted |
The rear antenna services the passenger headset and is located close to the dongle against the inside of the read fender. The red dot is up and outwards facing per the J&M instructions.
 |
| Front Antenna Mounted |
The forward antenna services the riders headset and it located as close to the headset as possible by locating it on top on the plastic tank under the tupperware. Again the red dot is facing up. The paper tape backing has been replaced with black vinyl electrical tape. An extra piece of Velcro secures the cable. I had originally located the antenna behind the instrument cluster, but this location was recommended by J&M.
Power Supply Install
I wasn't able to locate a suitable flat mounting surface near the battery so I fabricated a simple mounting plate out of sheet aluminum. The plate is mounted using the existing fender mounting bolts and creates a clean flat mounting surface for the power supply.
 |
| Power Supply Mounting Plate |
The power supply is mounted to the aluminum place via the provided double sided tape.
 |
| Power Supply Mounted on Aluminum Plate |
The power supply cables are routed directly to the batter posts. Switched power is provided by a wire running to the Zumo power cable. Utilizing this source allowed me to avoid splicing into the RT wiring harness and also keeps the Dongle alive for a short time after the ignition is switched off. Current should not be a issue since the power supply contains a relay, as does the adapter harness.
 |
| Power Supply and Other Wire Routing |
In the lower left you can see the split loom tubing that houses the adapter harness wiring, switched power and front mounted antenna cable. At the top left is the supplier bright red fuse holder that contains a 5 amp fuse.
The Split loom runs along side other wiring and is securely fastened with wire ties.
R1200RT Adapter Harness Installation
I mounted the adapter on the frame behind the headlamp assembly at the center of the photo. The instructions indicated attaching it to the nose piece, but I felt that would make removal of the nose difficult. This way there are no connections from the nose piece to the J&M system with one minor exception. It's not visible in any of the photos but the forward antenna is mounted to the underside of the speaker cover with Velcro and is easily removed when there is a need to remove the dash. In this photo you can also see the speaker connections in the top left. I later found that I had to route these wires slightly differently along the back side of the frame rather than the front in order to get the nose to fit without interference.
 |
| Adapter Installation |
Pairing Switch Mounting
The paring switch is a bit awkward. My first instinct was to mount it out of sight under the seat. I later thought that given the issues that Bluetooth can have with paring I would prefer to be able to see the indicator lights to know what tehe system is doing and be able to reset it without removing the seat if needed. Given that criteria and the short cable I elected to mount it underneath the luggage rack just ahead of the tail lamp assembly. It is barely viable when standing next to the RT. Be aware that the front riders headset is controlled by the button farthest away from the cable. The one closest to the cable controls the passenger headset.
 |
| Paring Switch |
Speaker on/off switch Mounting
The final piece to mount was the speaker on/off switch. This switch is very bulky and has a short cable attached to the adapter harness so the options are limited. The instructions called for drilling a hole in the dash panel to mount the switch. I was not happy with drilling a 15/32 hole in my dash board to I looked for a different solution. The bracket I have here is not ideal, but it is working and did not require any modifications to the RT.
 |
| Supplied Speaker on/off Switch and My Bracket |
 |
| Speaker on/off switch and bracket mounted with Velcro |
System Operation
Pairing instructions are included with both the headsets and the Blue Hub Dongle08. Its a bit confusing which paring button is which. It turns out that the one that is closest to the cable is for the passenger and the one on the end is for the rider. I experimented with paring with each of them and that seemed to work the best and matches the instructions that I received from J&M tech support.
My first impression is that once paired the audio quality is very good in the Nolan. The speakers can play quite load and the distortion is not bad. The bass response is just OK.
I did notice nose in the headset anytime the Bluetooth radio is activated in the headset, even if it is not paired or linked. This is not noticeable while moving as it is masked by even modest wind noise.
When operating the units it seems to be important to have the helmet turned on before the ignition is switched on. When switching on the bike first the link does not always occur. If the link is broken for some reason, such as stepping away from the bike, it has trouble re-linking.
I tested the system with both the FM radio and a USB drive with MP3s and both worked well and does the handlebar mounted volume control. The volume on the headset does reset each time the power is cycled on it.
I did test Pandora Radio on the Bionic and it worked very well using the provided J&M cable. I still have to test making calls on my Droid Bionic when connected to the J&M system. The phone can be used with the cable or linked to the individual headset.
Conclusion
The system took a good deal of time to install, the better part of two days working at a leisurely pace and with interruptions. While expensive, it seems to deliver as promised. I will have to reserve final judgement until I get the Shoei back and test the intercom features and then test it all in actual riding conditions. That wont happen for a while here in Michigan.
Thanks for reading. This article is for informational purposes only and remember your mileage may vary.
If you found this useful please click the Google +1 link below, share on Facebook, follow me on Blogspot or click through on the adds at the top of the page. That helps me keep the blog going. Your comments and feedback are always welcome.
Cheers
Blaine